
Outlook add-in for Smarter Visitor Registration
Generate the manifest, deploy the add-in centrally for everyone or for specific groups only, and register visitors directly in the Outlook appointment.
What the add-in does
The add-in adds a button to the Outlook appointment. One click registers all invited people as expected visitors and inserts a QR code into the invitation. Visitors use this code to check in at the terminal.
The setup consists of three parts: publish the manifest in the settings, deploy the add-in in the Microsoft 365 admin center and, if you have several locations, define which appointment belongs to which location.
Generating and publishing the manifest
The manifest describes the add-in for Outlook: name, button and the address of your installation. You generate it under Settings › Outlook Add-in.
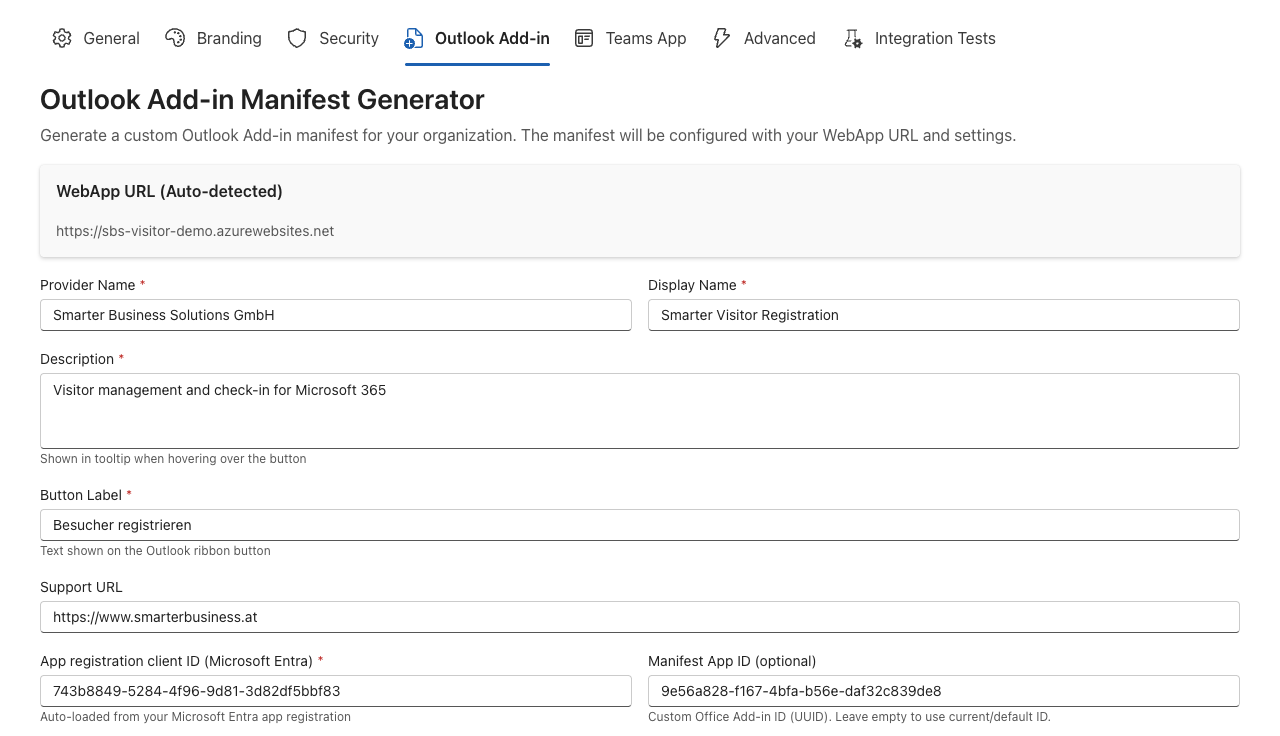
| Field | Meaning |
|---|---|
| Provider Name | Name of your company or of the vendor, as it appears in add-in management. |
| Display Name | Name of the add-in and label of the group in the ribbon, for example “Visitor registration”. |
| Description | Tooltip text that appears when you hover over the button. |
| Button Label | Text of the button in the appointment, for example “Insert QR code”. |
| Support URL | Address where your employees can find help. |
| App registration client ID (Microsoft Entra) | The client ID of the app registration. Filled in automatically. |
| Manifest App ID (optional) | Custom identifier of the add-in. Normally leave empty. |
| Version | Version of the manifest, for example 2.0.0. Increase it with every change. |
- Fill in the fields. Choose the display name and button label in the language of your employees.
- Click Save & Publish Manifest.
- Copy the manifest address shown,
https://<name>.azurewebsites.net/manifest.xml, or download the filemanifest.xml.
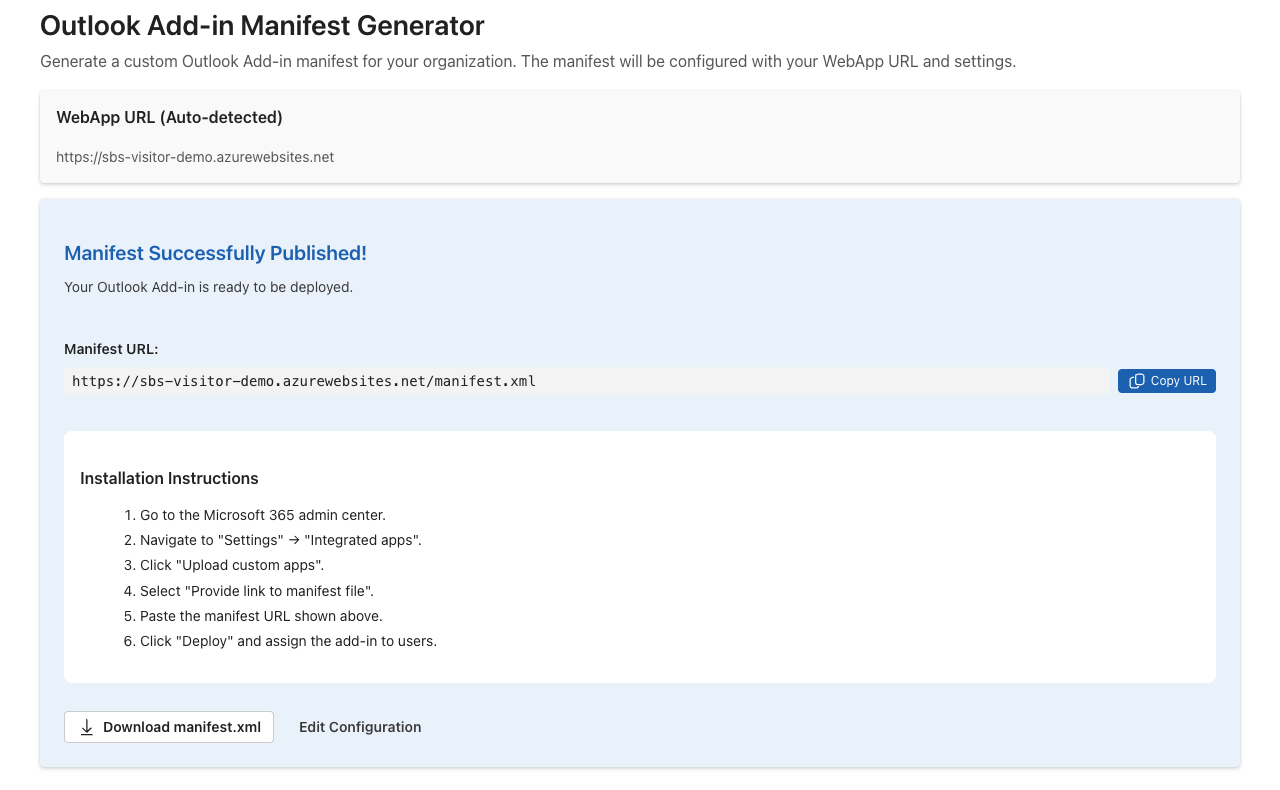
Manifest address
The address of the manifest can be retrieved without sign-in so that the Microsoft 365 admin center can load it. It contains no secrets.
Deploying the add-in in the Microsoft 365 admin center
Centralised deployment installs the add-in for the selected people in Outlook for Windows, Mac and on the web. You need the Exchange Administrator or Global Administrator role for this.
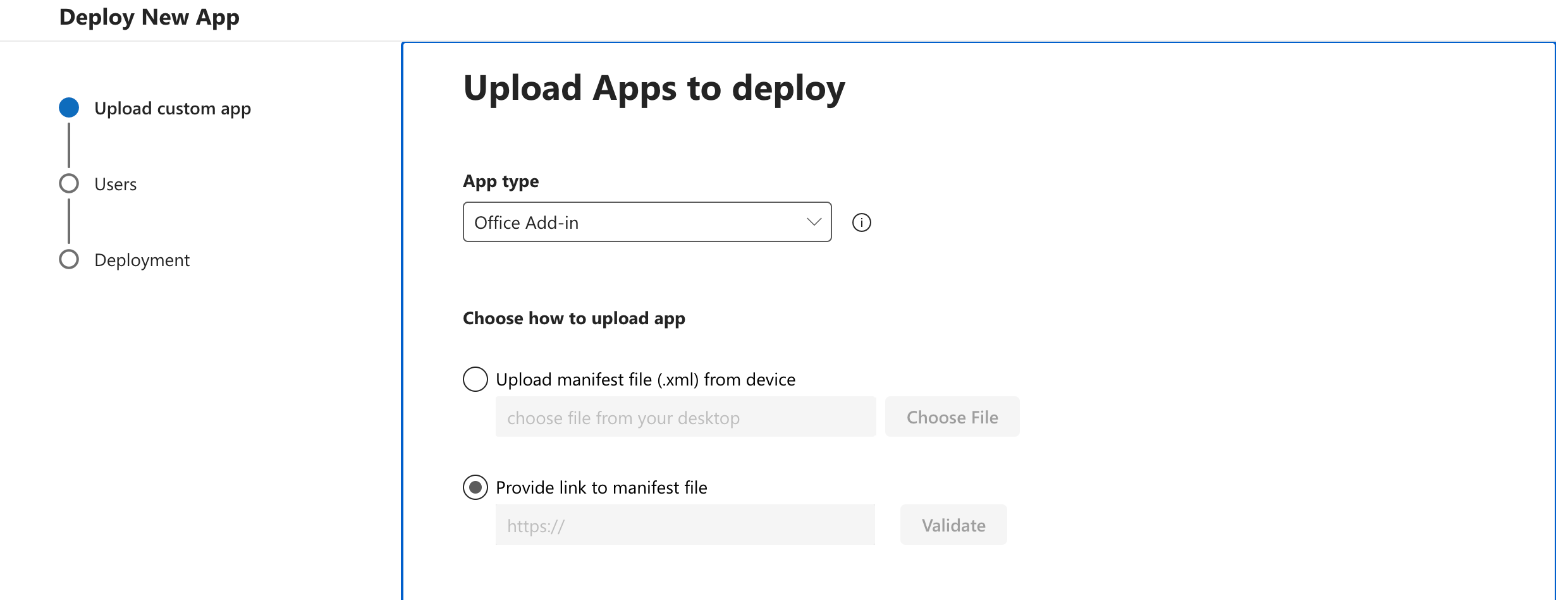
- Open the Microsoft 365 admin center and select Settings › Integrated apps.
- Click Upload custom apps.
- Select Office Add-in as the app type.
- Select Provide link to manifest file and paste the manifest address. Alternatively, upload the downloaded
manifest.xml. - Define who receives the add-in: Just me for the first test, Entire organization or Specific users/groups.
- Confirm the permissions and finish the deployment.
Allow time after the deployment
According to Microsoft, it can take 24 to 72 hours until the add-in appears in the ribbon for everyone. Outlook must be restarted for this. Therefore test with “Just me” first.
Rolling out to specific groups or locations only
Who sees the button in Outlook is controlled solely by the assignment in the Microsoft 365 admin center. For a gradual rollout, for example location by location, this approach works well:
- Create one group per location, for example “Visitor Registration Vienna”. Use a Microsoft 365 group or a mail-enabled security group.
- Assign the add-in to the groups: During deployment, select Specific users/groups and add the groups of the locations that are starting. You add further groups later with Edit users.
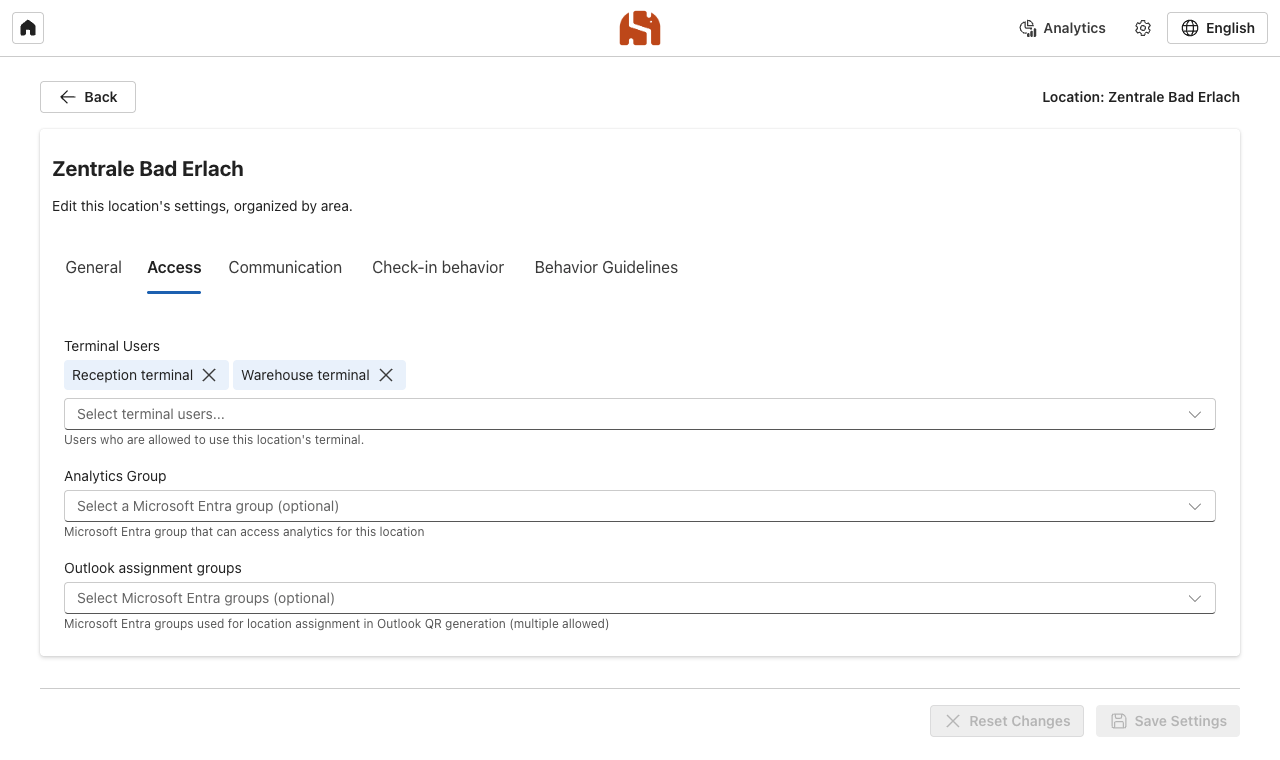
- Assign the group to the location: Enter the same group in the settings of the location under Access › Outlook assignment groups. Appointments created by these people are then assigned to the correct location automatically.
Microsoft restrictions for groups
Centralised deployment supports Microsoft 365 groups, distribution lists and mail-enabled security groups. Security groups without an email address and nested groups are not taken into account. Always assign the add-in to the top-level group.
How an appointment is assigned to its location
There is no location selection in Outlook. The system assigns each appointment in this order:
- Location of the appointment: If the “Location” field contains exactly the name of a location, this location applies. Upper and lower case do not matter.
- Group of the host: If the person who creates the appointment is a member of an Outlook assignment group, the associated location applies.
- Primary location: In all other cases, the primary location is used.
Visit at a different location
If you receive guests at a different location as an exception, enter the location name as the location of the appointment. At the terminal of a location, only appointments of this location can be checked in.
QR template and attachments
You define what the add-in writes into the appointment for each location under Check-in behavior › Outlook QR code. The template must contain the placeholder {{qrCode}}; {{locationName}} inserts the name of the location.
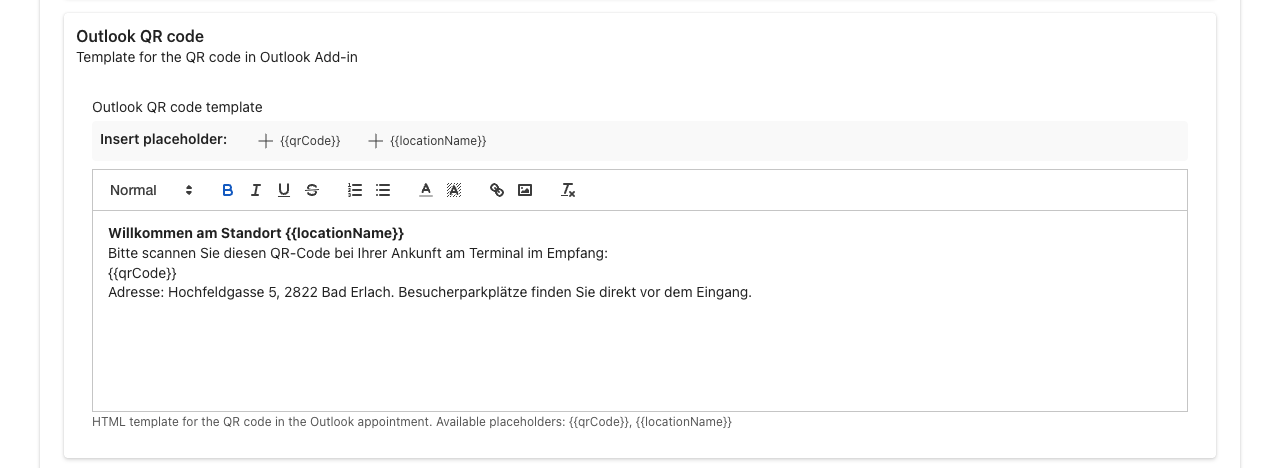
- Use the template for everything visitors should know: address, parking, where to report at reception.
- If behavior guidelines with Attach to Outlook invitation are active at the location, the add-in adds the guidelines files as attachments.
- Without a custom template, the add-in uses a short default text with the QR code.
Registering visitors in the appointment
- Create a new appointment in Outlook and add the visitors as attendees.
- Enter the subject, the time and, if you have several locations, the location.
- Click the add-in button in the ribbon. After a few seconds, the QR code is in the appointment.
- Send the invitation as usual.

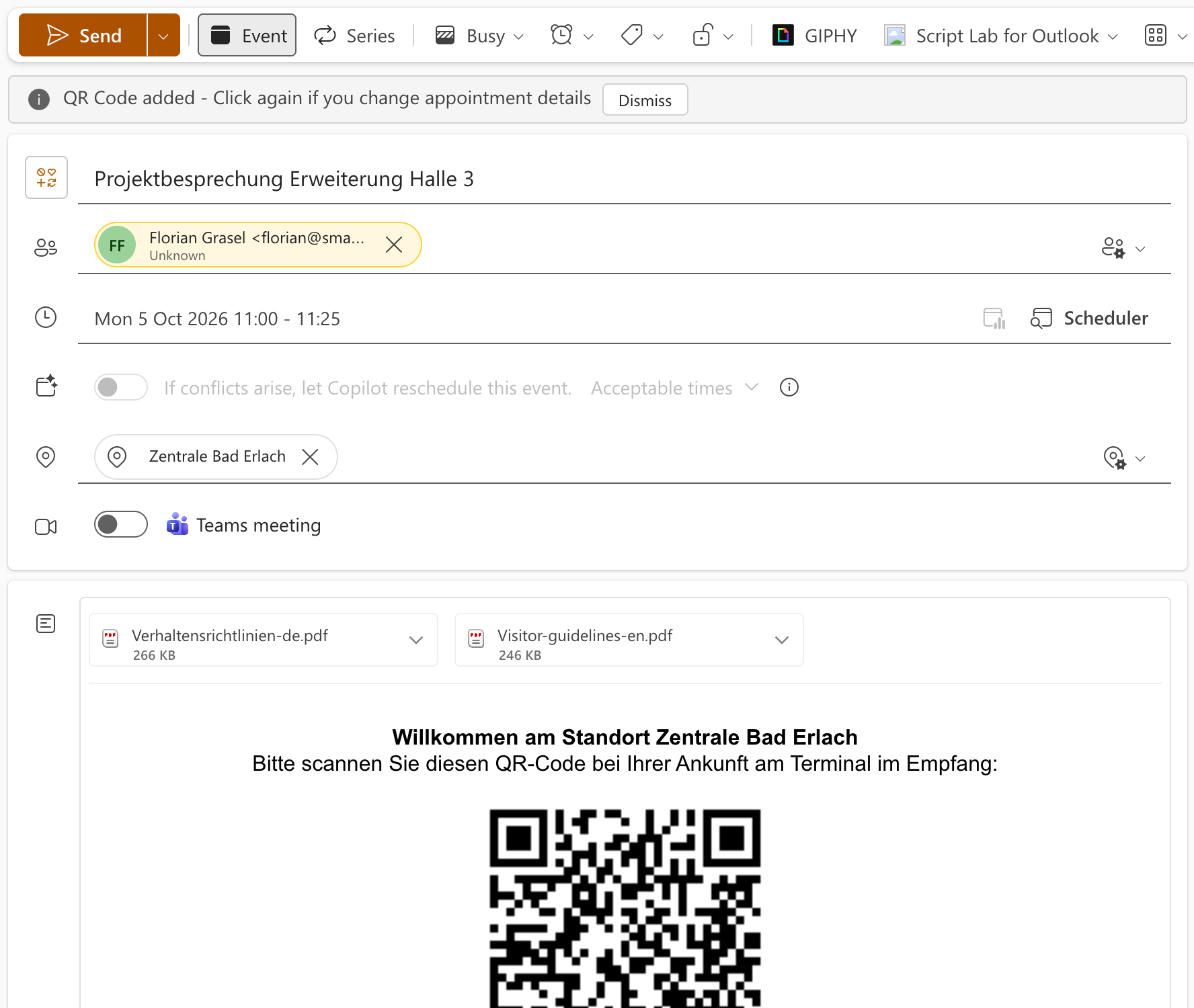
- All attendees count as visitors: required and optional, internal and external. Only the organiser is excluded.
- The content of the appointment is replaced. Insert the QR code first and write your invitation text afterwards, or store it in the template.
- Click again after changes: If you change attendees, time or location, click the button once more. The QR code stays the same, and the registration is updated.
- The registered people appear immediately as “Planned” in the analytics of the location.
Updating the manifest or removing the add-in
- Changing the label or name: Adjust the fields in the settings, increase the version and publish again. Then open the add-in under Integrated apps and select Update add-in.
- Changing the assignment: Open the add-in under Integrated apps and select Edit users.
- Removing: In the same area, select Remove app. QR codes that have already been sent remain valid.
Frequently asked questions
In which Outlook versions does the add-in work?
The button does not appear.
The QR code is not created.
The terminal says that the appointment does not belong to this location.
Can I exclude internal attendees from the registration?
Questions about this product?
Our support team is happy to help with any questions about Smarter Visitor Registration.