
Installing Smarter Visitor Registration
From the deployment in Azure to the first sign-in: which resources are created, which permissions are required and how you put the application into operation.
How the installation works
Smarter Visitor Registration runs in your own Azure subscription. A template creates all resources, then the application package is deployed and the solution is set up in the browser. Allow about one hour if the required permissions are in place.
You receive the template and the application package from us. If you wish, we carry out the installation together with your IT team in a remote session. Contact us to arrange this.
Prerequisites
| Area | Requirement |
|---|---|
| Azure | A subscription and a resource group in which you are Contributor or Owner. |
| Microsoft Entra ID | Rights to create an app registration, to assign Microsoft Graph roles to a managed identity and to grant admin consent. In practice: Global Administrator or Privileged Role Administrator. |
| Microsoft 365 | Exchange Online for the Outlook add-in and for sending emails, optionally Microsoft Teams. |
| Object ID of the first administrator | The Entra object ID of the person who carries out the initial setup. You find it in the user profile in the Entra admin center or with az ad signed-in-user show --query id -o tsv. |
| Session secret | A random string of at least 32 characters, for example from openssl rand -hex 32. |
No first sign-in without an object ID
As long as no admin group is set up, only the object IDs specified during deployment may open the settings. If the value is left empty, nobody can carry out the initial setup.
What is created in Azure
| Resource | Purpose |
|---|---|
| App Service (Linux, Node.js 22) | The web application with terminal, settings, analytics and the interface for the Outlook add-in. HTTPS only, TLS 1.2 or higher. |
| Azure Cosmos DB (Serverless) | Database with the containers for planned appointments, visitor contacts, check-ins, settings, audit log and files. |
| Managed identity | Reads group memberships and users through Microsoft Graph (application roles Group.Read.All and User.Read.All). No client secret is required. |
| App registration | Sign-in for browser, Outlook and Teams. Exposes the scope access_as_user; Outlook and Teams are already pre-authorised for it. |
| Application Insights (optional) | Logs and telemetry for operations. |
| Key Vault (optional) | Stores the database key and the session secret instead of keeping them in the app settings. |
The running Azure costs depend on the pricing tier and on usage. In the smallest configuration (App Service B1, Cosmos DB Serverless) they are around 20 euros per month as a guide value. Microsoft bills these costs to you directly.
Deploying the resources
You deploy the template (main.json) in the Azure portal with Deploy a custom template or with the Azure CLI. These parameters are relevant:
| Parameter | Meaning | Default |
|---|---|---|
deploymentName | Prefix for all resource names, 3 to 20 characters | – |
webAppName | Name of the web app and therefore the address https://<name>.azurewebsites.net. Must be globally unique. | <deploymentName>-webapp |
appServicePlanSku | Pricing tier of the App Service | B1 |
adminBootstrapObjectIds | Object IDs of the people who may carry out the initial setup, separated by commas | empty |
jwtSecret | Session secret, at least 32 characters | – |
azureAdClientId | Client ID of an existing app registration. Leave empty so that the template creates one. | empty |
enableAppInsights | Create Application Insights | true |
enableKeyVault | Store secrets in a Key Vault | false |
visitorsRetentionDays | Automatic retention period for visitor contacts in days, 0 = no automatic deletion | 0 |
az group create --name rg-visitor-registration --location westeurope

az deployment group create \
  --resource-group rg-visitor-registration \
  --template-file main.json \
  --parameters deploymentName=visitorreg \
               webAppName=besucher-contoso \
               adminBootstrapObjectIds=<object-id> \
               jwtSecret=<secret>
After the deployment, note the outputs webAppUrl and azureAdClientId. You need the address of the web app for all further steps.
The address is tied to the installation
Sign-in, the Outlook manifest and the Teams app use the address <name>.azurewebsites.net. Choose the name of the web app with care. A custom domain requires additional changes to the app registration. Please contact us about this.
Deploying the application
The template creates the infrastructure. You deploy the application itself as a ZIP package:
az webapp deploy \
  --resource-group rg-visitor-registration \
  --name besucher-contoso \
  --src-path deploy.zip --type zip
Then check the address https://<name>.azurewebsites.net/api/health in the browser. The response {"status":"ok", …} shows that the application is running.
Granting consent in Microsoft Entra
The app registration is called Visitor Registration <deploymentName>. It uses delegated Microsoft Graph permissions, including Mail.Send for emails to visitors. So that the terminal can send emails without a prompt, grant admin consent once:
- In the Microsoft Entra admin center, open Applications › App registrations and select the app.
- Go to API permissions.
- Click Grant admin consent for <tenant> and confirm.
| Permission | Type | Purpose |
|---|---|---|
User.Read, User.ReadBasic.All, People.Read | delegated | Sign-in and people search |
Group.Read.All | delegated | Group selection in the settings |
Mail.Send | delegated | Emails to visitors on behalf of the terminal account |
Group.Read.All, User.Read.All | Application (managed identity) | Check group memberships, resolve contact persons for Teams calls |
Emails from the Teams desktop app
If the terminal runs in the Teams desktop app, the server sends the emails on its behalf. For this, the app registration needs a client secret, which you store in the App Service as the setting AZURE_AD_CLIENT_SECRET. This is not necessary in the browser or in Teams on the web.
First sign-in and setup wizard
Open https://<name>.azurewebsites.net/admin and sign in with the account whose object ID you specified during deployment. As long as the solution has not been set up, the wizard starts.
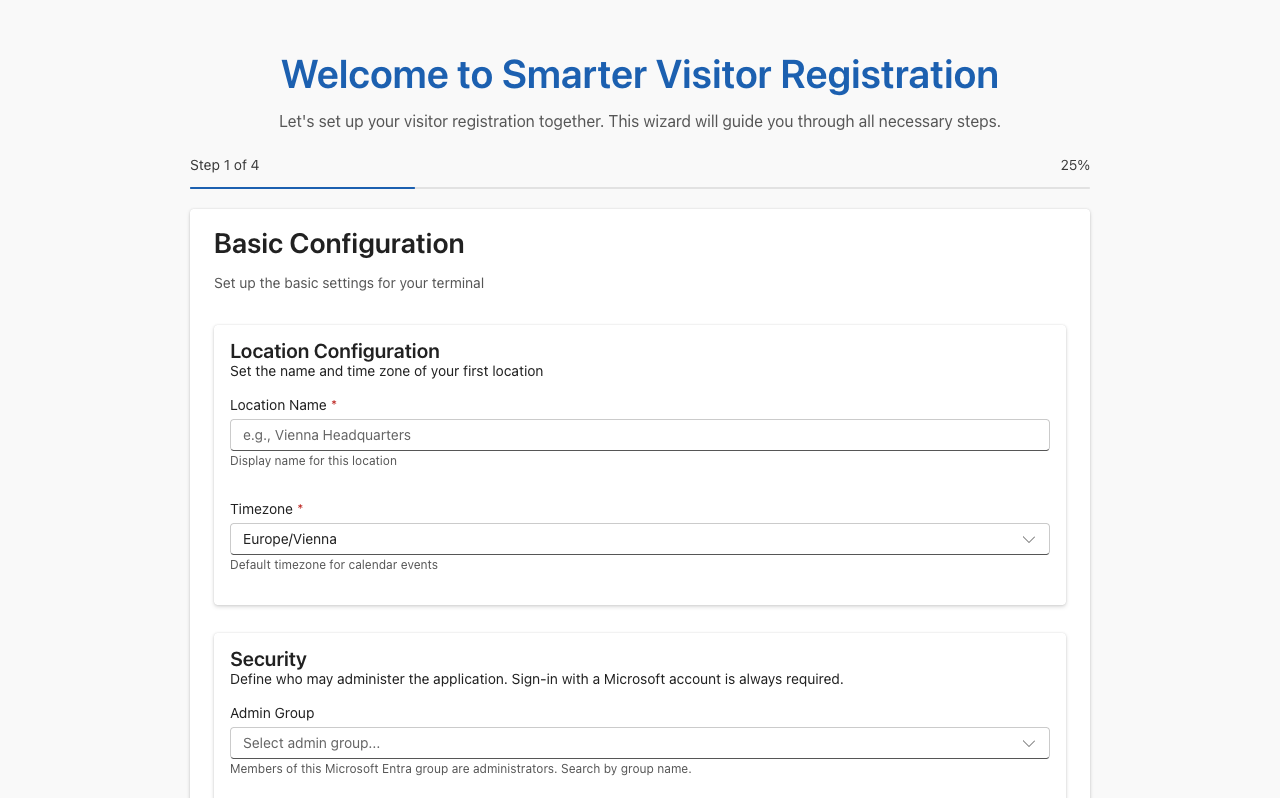
1. Basic Configuration
Name and time zone of the first location. Optionally the admin group, which you can also set later.
2. Locations
Create further locations with terminal users and check-in behavior.
3. Branding
Company name, logo and colours of the terminal.
4. Timeouts
How long success messages stay on screen and when the terminal returns to the home screen.
With Complete Setup, the wizard saves your entries and opens the terminal. You can change all values later in the settings.
Do not forget the admin group
Under Settings › Security, enter an Entra group as the admin group and check that you are a member yourself. As soon as the group is set, the object IDs from the deployment no longer apply.
Next steps
- Set up locations: terminal users, guidelines and emails.
- Publish and roll out the Outlook add-in.
- Set up the terminal as a kiosk, in the browser or in Microsoft Teams.
- Test the first visit.
Updates and operations
- Updating the application: Deploy the new ZIP package with
az webapp deploy. Settings and data are stored in the database and are preserved. - Changes to the infrastructure: Deploy the template again, for example to change the pricing tier or to set a retention period.
- Checking the version: The installed version is shown in the footer of the settings and the analytics.
- Backup: Cosmos DB backs up the data automatically at regular intervals. For longer retention, adjust the backup policy of the database account.
- Monitoring: The App Service checks the application through
/api/health. You find errors and logs in Application Insights.
After an update
If the Outlook add-in or the Teams app has changed, the release notes say so. In that case, publish the manifest again or upload the new Teams package with a higher version number.
Troubleshooting
After sign-in, a message says that you are signed in but not authorised for this area.
ADMIN_BOOTSTRAP_OBJECT_IDS of the App Service. After that: check your membership of the admin group.The deployment fails at the app registration or the Graph roles.
azureAdClientId.The name of the web app is already taken.
azurewebsites.net are globally unique. Choose a different value for webAppName.Visitors do not receive emails.
Mail.Send, whether the terminal account has a mailbox and whether sending is enabled at the location. In the Teams desktop app, the client secret is also required.The application does not start or responds with error 500.
Questions about this product?
Our support team is happy to help with any questions about Smarter Visitor Registration.