In the first part of our CRM automation series, we explained how we collect leads from multiple sources and store them in a central Microsoft List using Microsoft 365 and Power Automate. Building on that, the second part shows how we move leads into the list with Azure Functions. With a single source of truth in place, the next step is timely follow‑up — so we notify our team whenever a new lead arrives. We implement this with Adaptive Cards, deep linking, and list conversations in Microsoft Teams.
Notify your team with Adaptive Cards in Power Automate
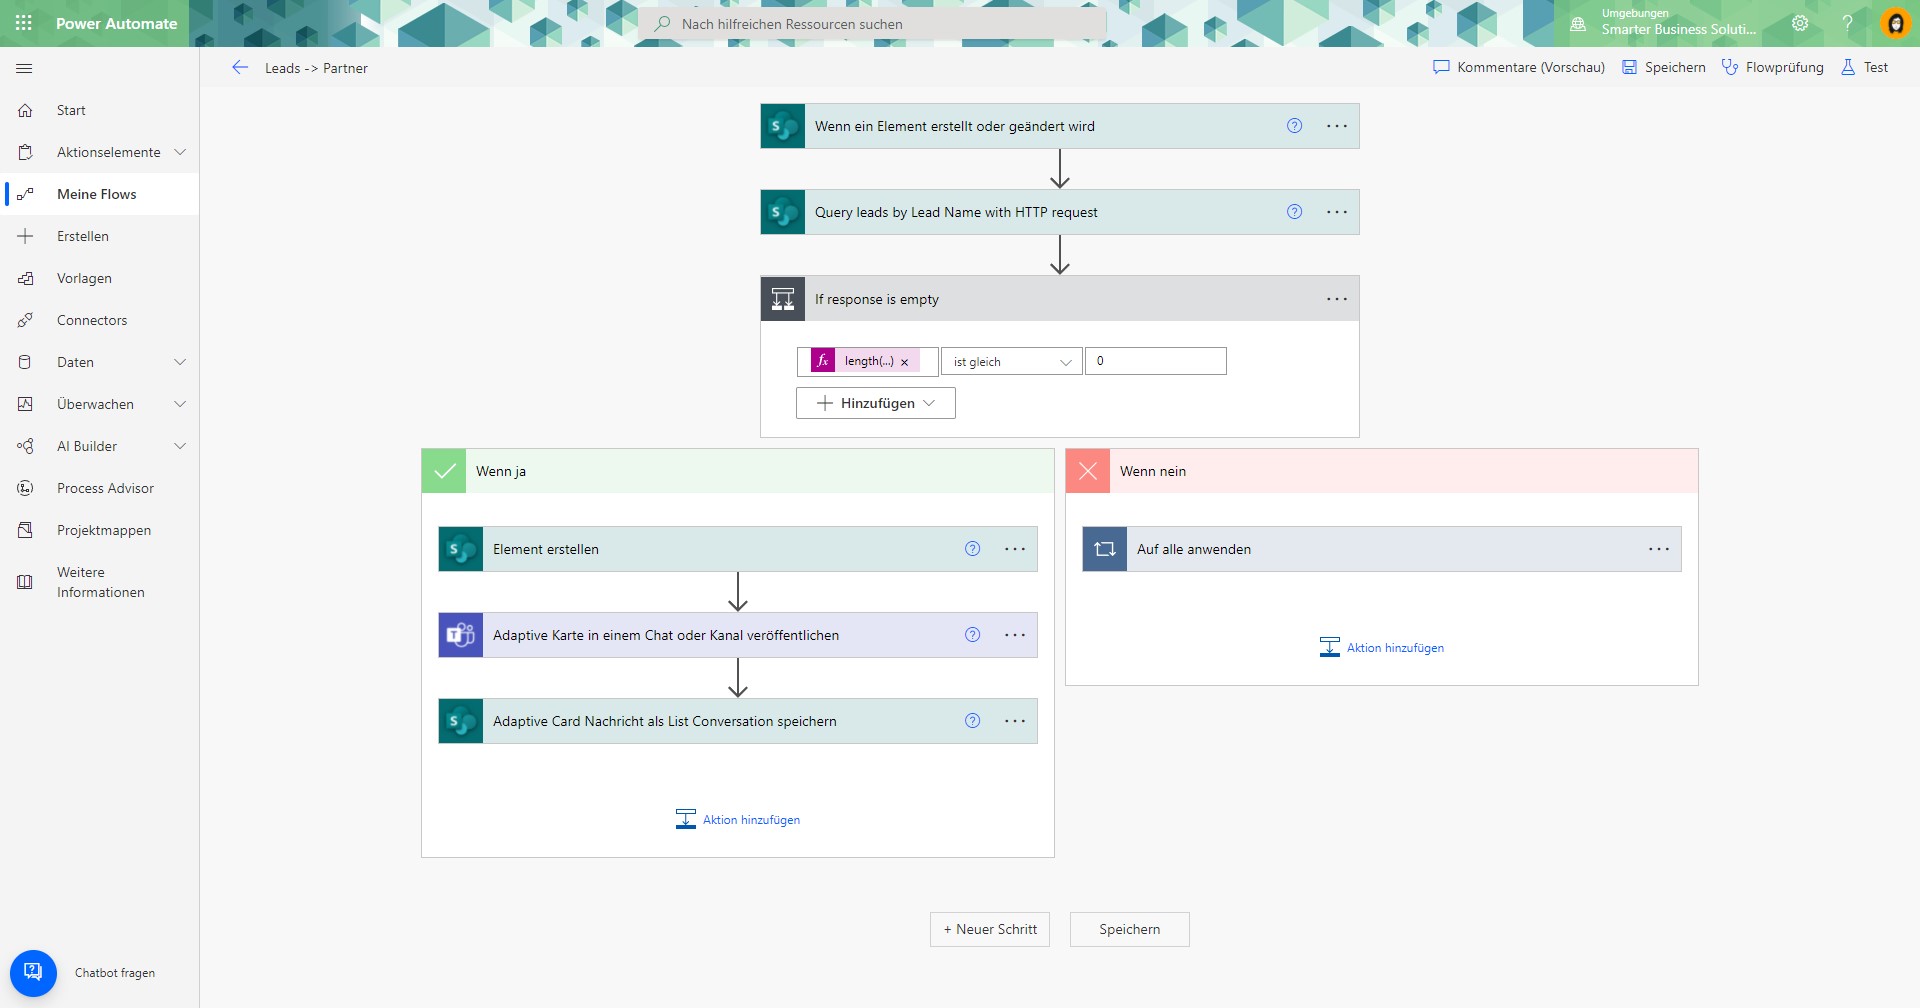
A Power Automate flow is a great way to notify the team about new leads. The flow runs as follows:
Trigger: A new lead is created in the Microsoft List.
- First, we check whether the team’s task list already contains this lead with the same product interest.
- If the lead does not exist yet, we create a task in the team’s task list.
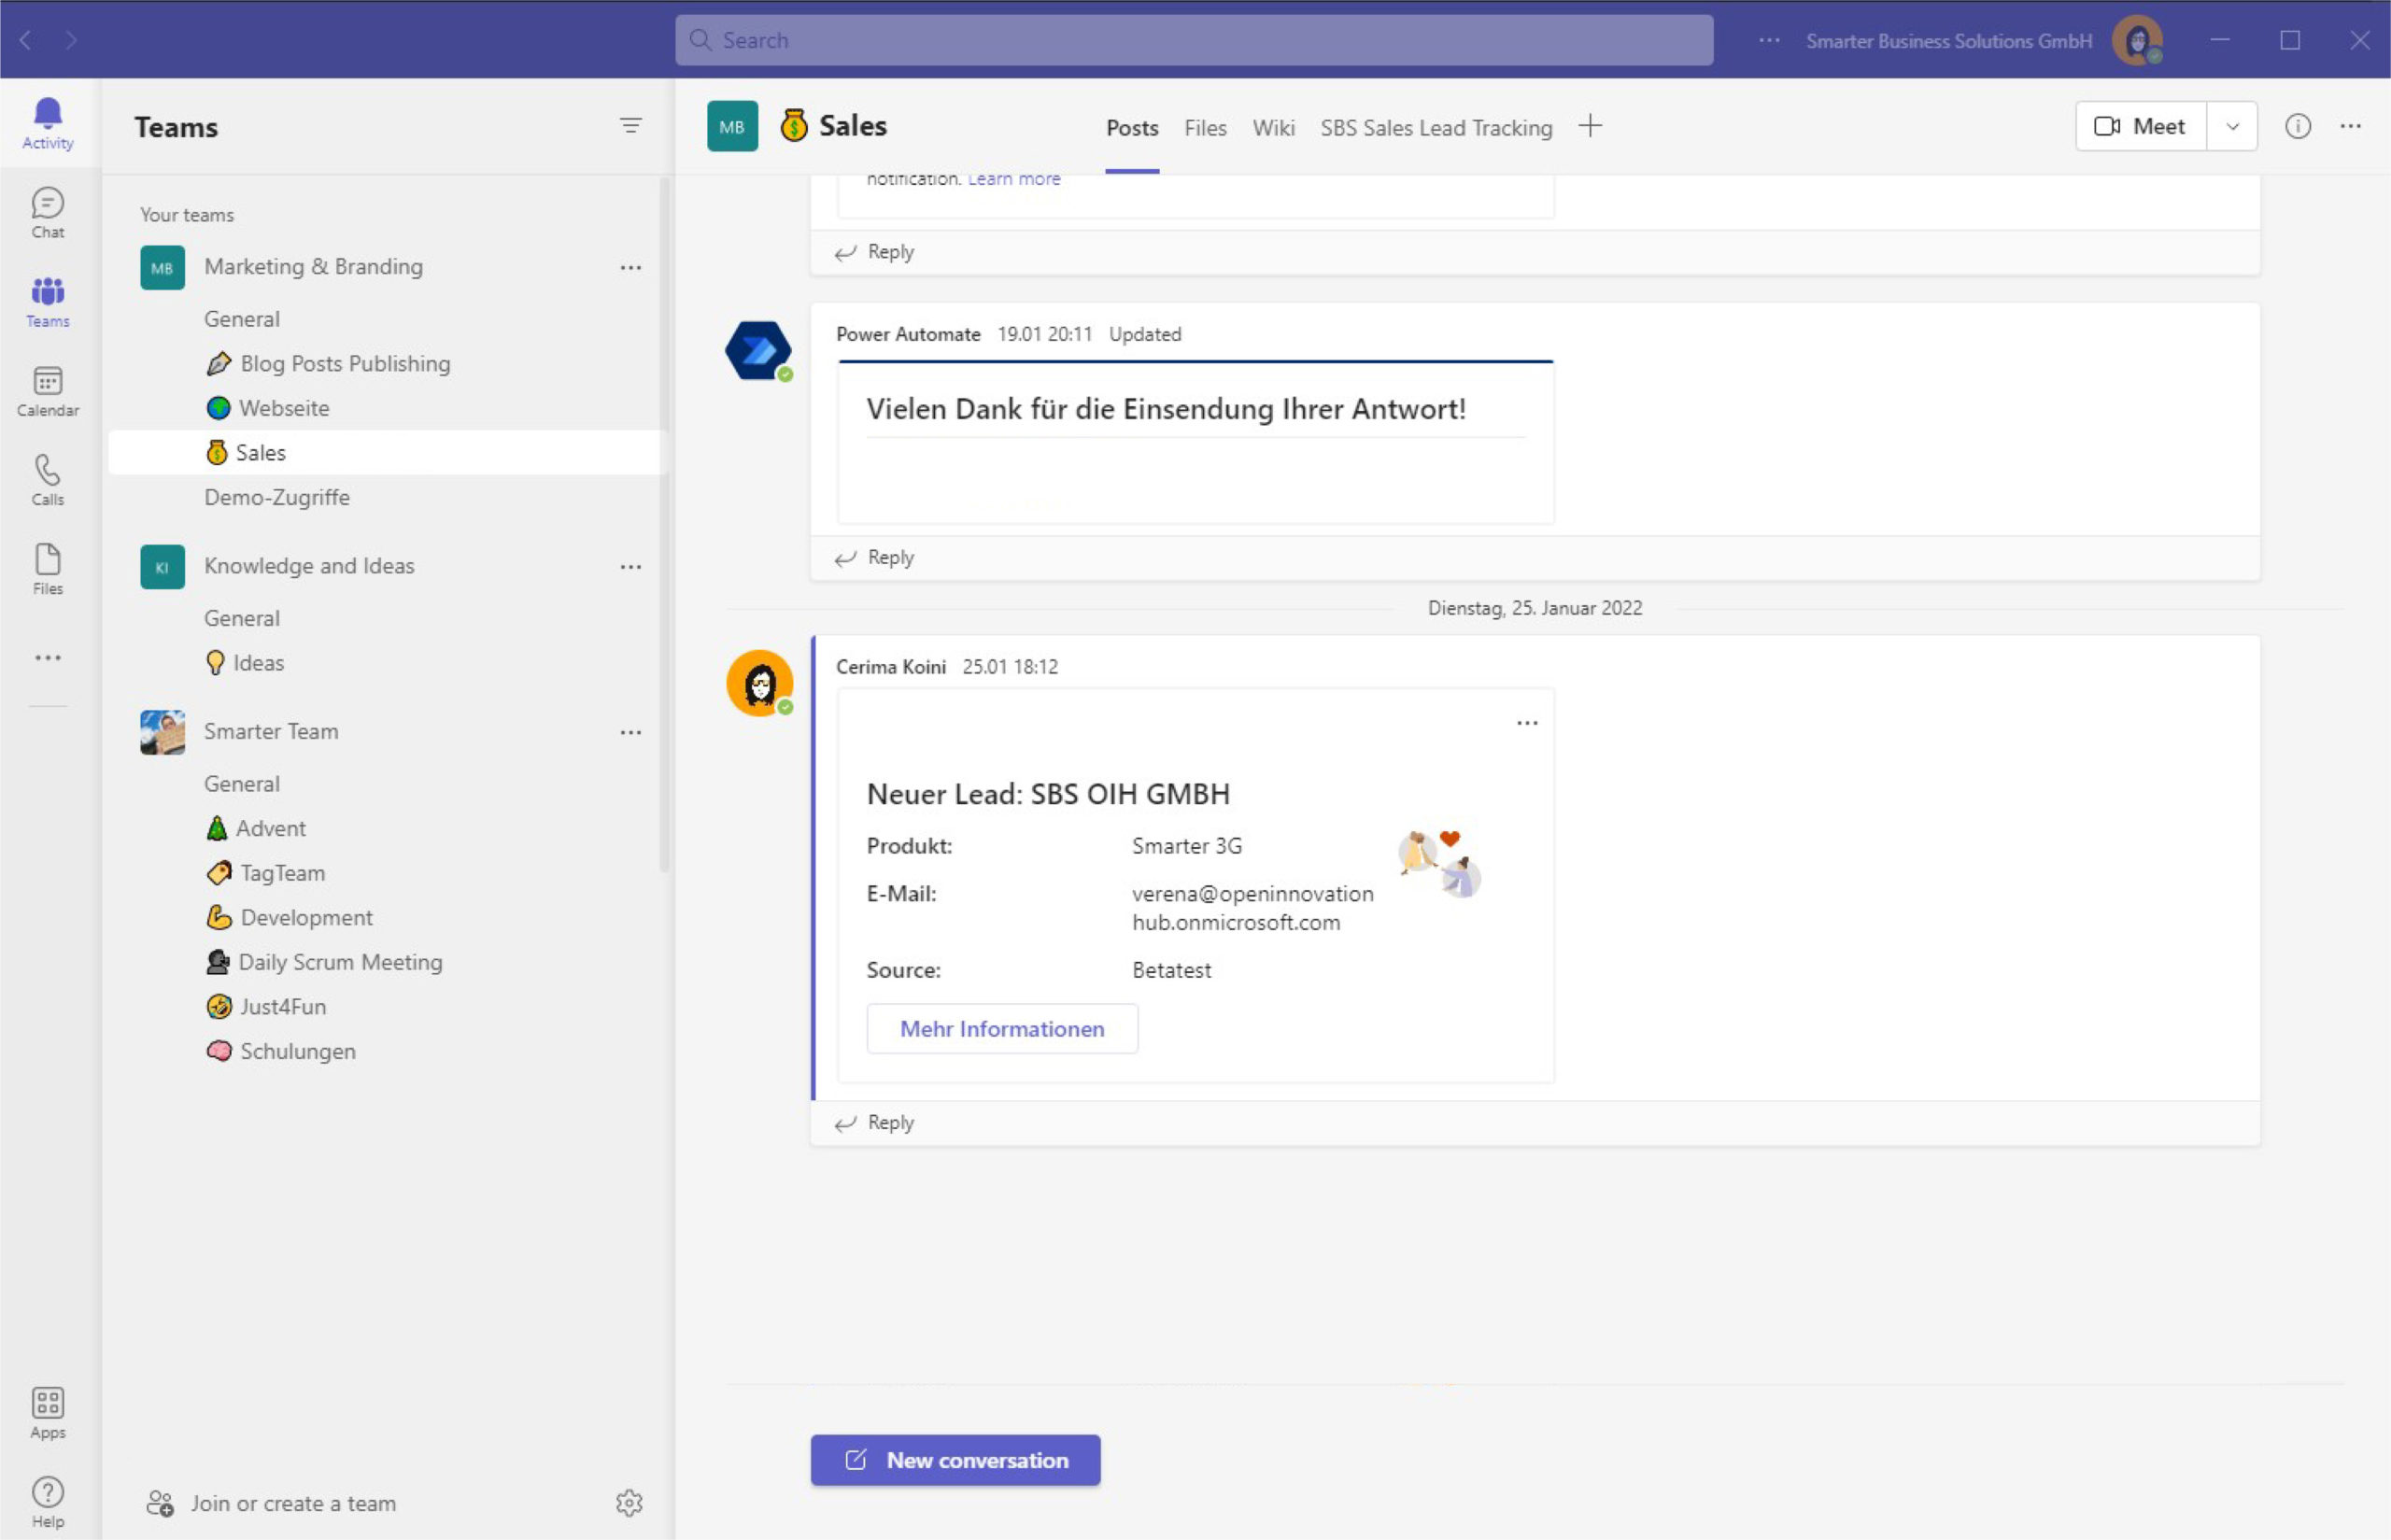
- Then we post a message about the new lead to the General channel in the form of an Adaptive Card.
- Finally, we save the message to the list conversation thread.
Publish an Adaptive Card to inform your team about new leads
Deep linking to a list item in Teams
To post an Adaptive Card to a Teams channel, we use the Power Automate action “Post an Adaptive Card in a chat or channel.” It’s straightforward:
- Choose whether to post as the user, the Flow bot, or a Power Virtual Agent. Make sure the target version matches what you select in the Card Designer later.
- Select the chat, channel, and/or team where the card should be posted.
- Provide the card payload. The easiest way to design it is with Microsoft’s Card Designer. Here’s the schema of our card:
{
"type": "AdaptiveCard",
"body": [
{
"type": "TextBlock",
"weight": "Bolder",
"size": "Large",
"text": "New lead: @{triggerOutputs()?['body/Title']}",
"wrap": true
},
{
"type": "ColumnSet",
"columns": [
{
"type": "Column",
"items": [
{
"type": "ColumnSet",
"columns": [
{
"type": "Column",
"width": "stretch",
"items": [
{
"type": "TextBlock",
"text": "Product:",
"wrap": true,
"weight": "Bolder",
"size": "Medium"
}
]
},
{
"type": "Column",
"width": "stretch",
"items": [
{
"type": "TextBlock",
"text": "@{triggerOutputs()?['body/Produkt']}",
"wrap": true,
"size": "Medium"
}
]
}
]
},
{
"type": "ColumnSet",
"columns": [
{
"type": "Column",
"width": "stretch",
"items": [
{
"type": "TextBlock",
"text": "Contact:",
"wrap": true,
"weight": "Bolder",
"size": "Medium"
}
]
},
{
"type": "Column",
"width": "stretch",
"items": [
{
"type": "TextBlock",
"text": "@{triggerOutputs()?['body/Title']}",
"wrap": true,
"size": "Medium"
}
]
}
]
},
{
"type": "ColumnSet",
"columns": [
{
"type": "Column",
"width": "stretch",
"items": [
{
"type": "TextBlock",
"text": "Phone:",
"wrap": true,
"weight": "Bolder",
"size": "Medium"
}
]
},
{
"type": "Column",
"width": "stretch",
"items": [
{
"type": "TextBlock",
"text": "@{triggerOutputs()?['body/Telefon/0/Number']}",
"wrap": true,
"size": "Medium"
}
]
}
]
},
{
"type": "ColumnSet",
"columns": [
{
"type": "Column",
"width": "stretch",
"items": [
{
"type": "TextBlock",
"text": "Email:",
"wrap": true,
"weight": "Bolder",
"size": "Medium"
}
]
},
{
"type": "Column",
"width": "stretch",
"items": [
{
"type": "TextBlock",
"text": "@{triggerOutputs()?['body/E-Mail']}",
"wrap": true,
"size": "Medium"
}
]
}
]
}
]
},
{
"type": "Column",
"items": [
{
"type": "Image",
"url": "https://smarterbusiness.at/wp-content/uploads/2022/02/logo.png",
"size": "Medium"
}
],
"width": 20
}
]
},
{
"type": "ActionSet",
"actions": [
{
"type": "Action.OpenUrl",
"title": "More information",
"style": "positive",
"url": "https://teams.microsoft.com/l/entity/26bda823-6023-480c-a22b-6b6s6605ce8c/_djb2_msteams_prefix_3161176291?context=%7B%22subEntityId%22%3A%22<listItemId>%22%2C%22channelId%22%3A%2219%3Aa7d7f48c9854129040ac4057c5245727%40thread.skype%22%7D"
}
]
}
],
"$schema": "http://adaptivecards.io/schemas/adaptive-card.json",
"version": "1.4"
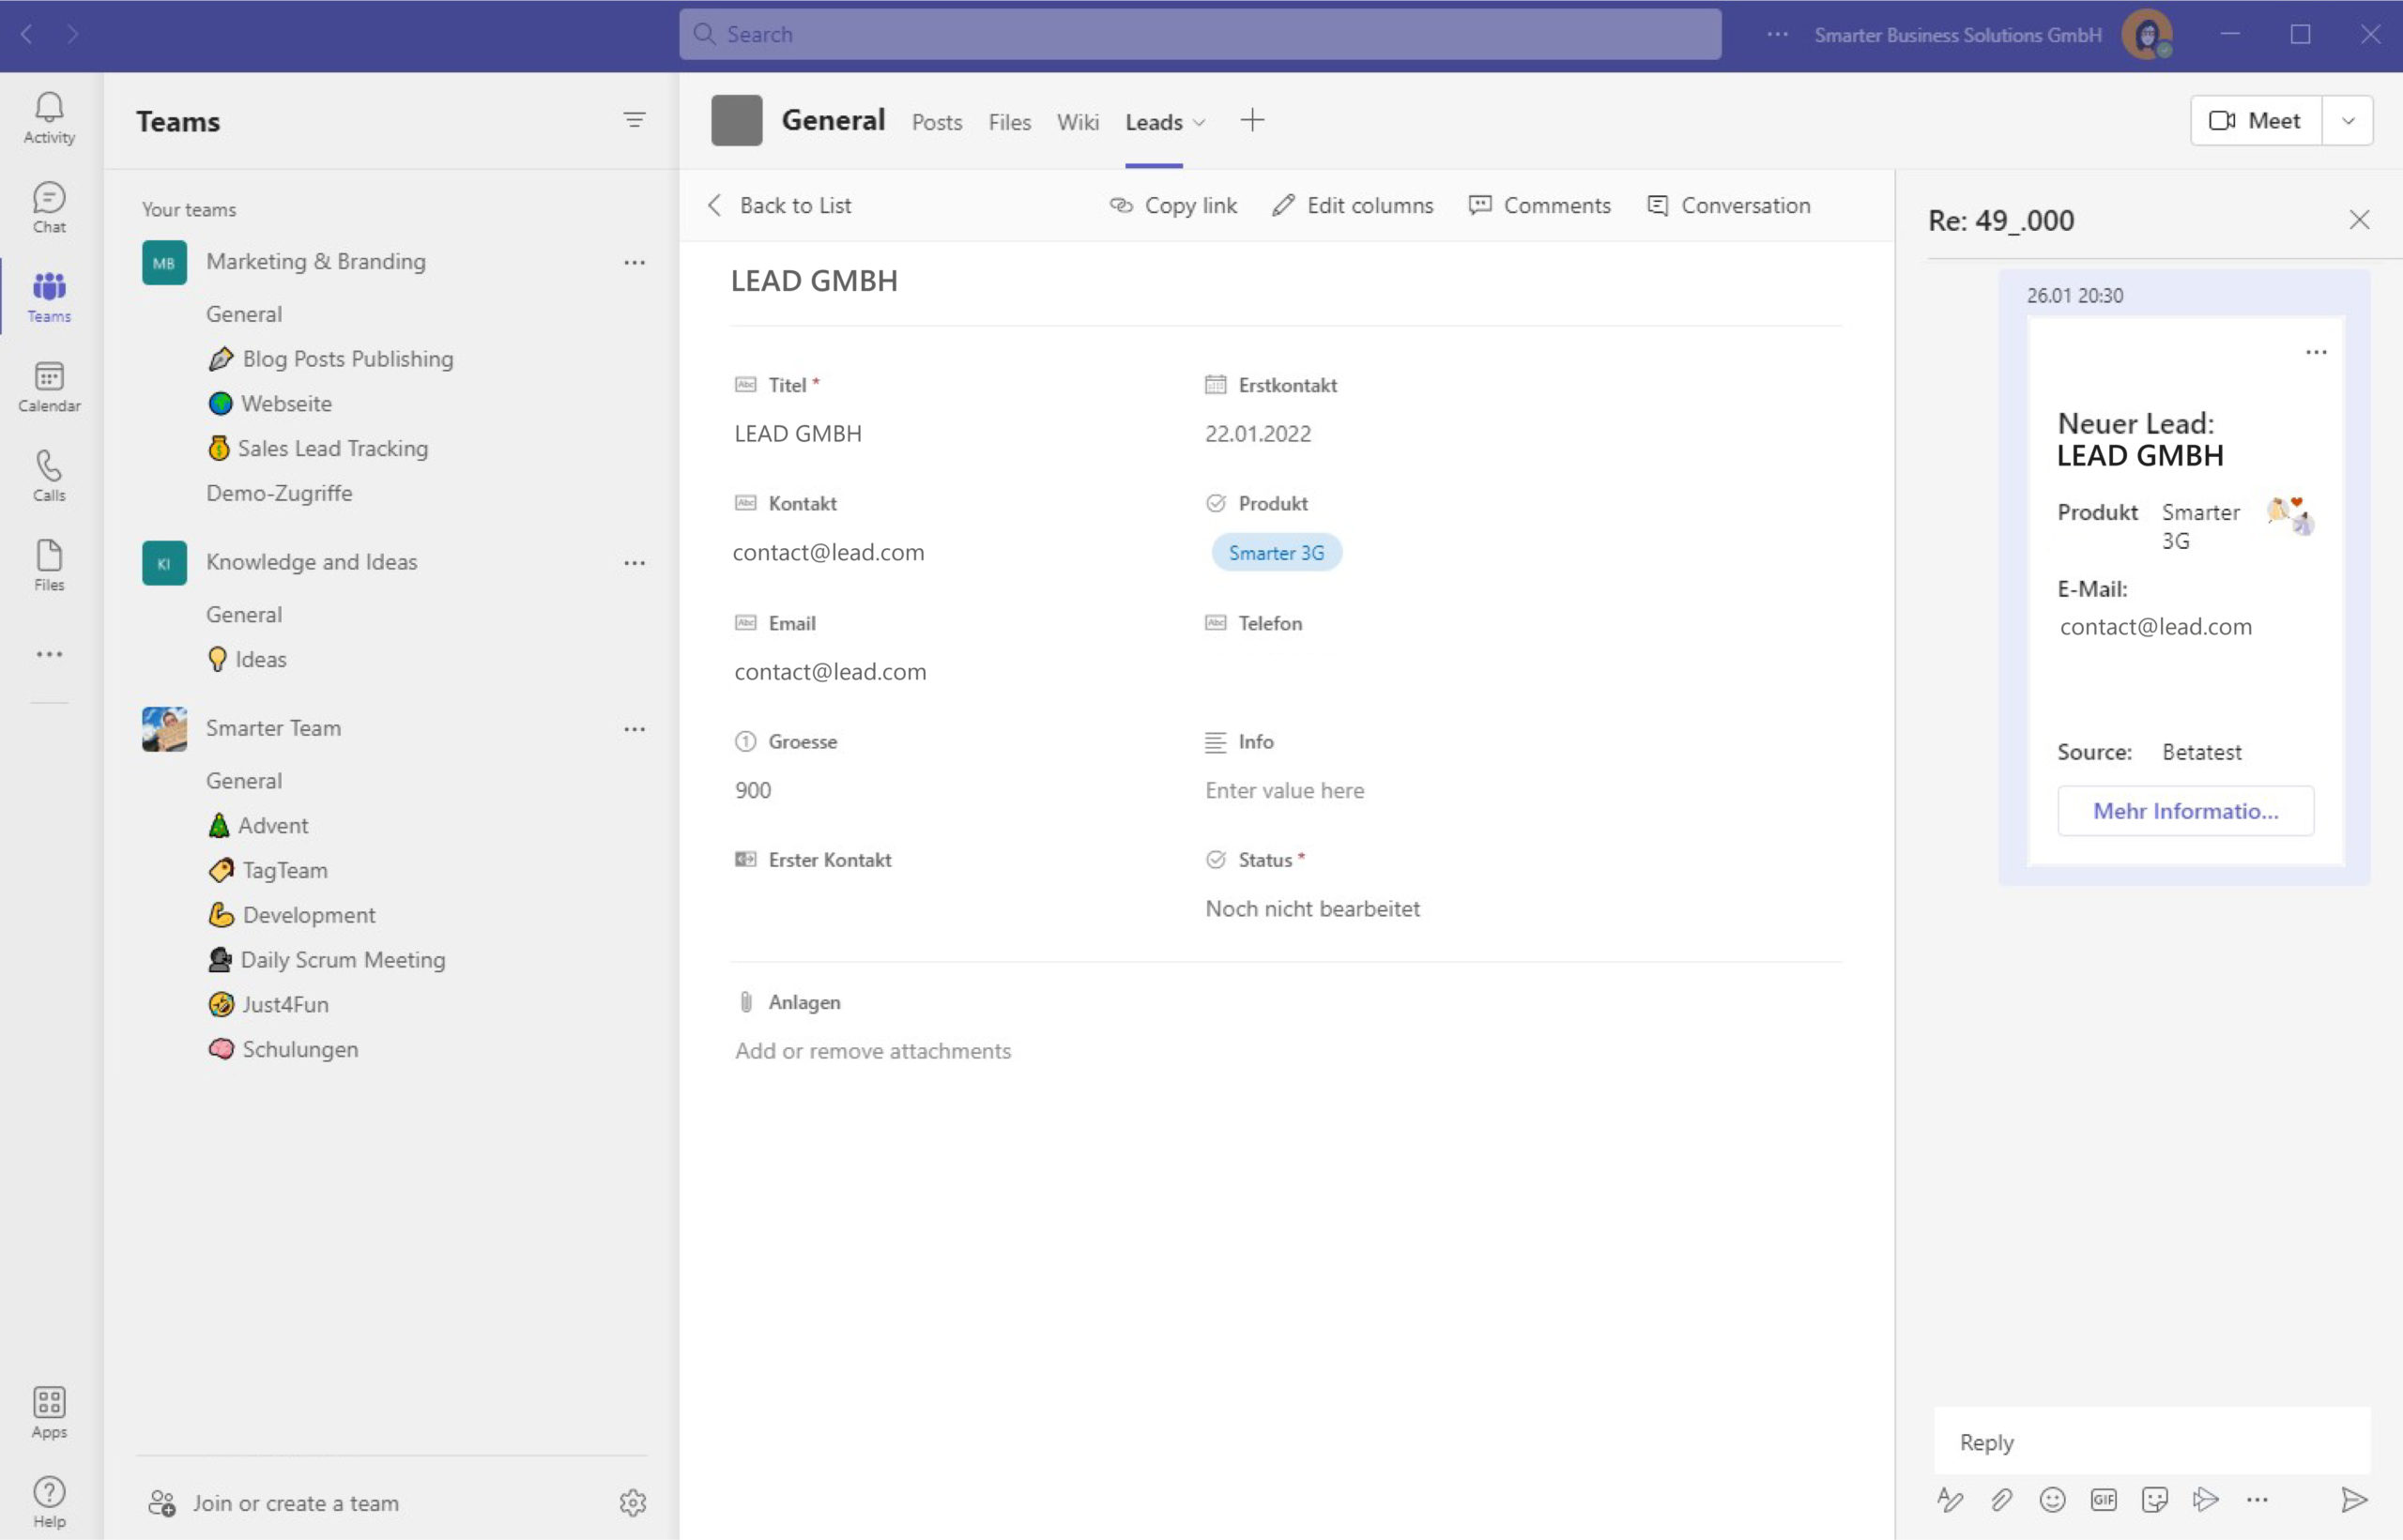
}Clicking “More information” on the Adaptive Card should take you directly to the list tab that hosts the item in Teams. That’s called deep linking. To enable it, we assemble a deep link URL and pass it to the card’s OpenUrl action.
Before URL encoding, a deep link to a list item looks like this:
https://teams.microsoft.com/l/entity/<appId>/<entityId>?context={"subEntityId":"<listItemId>", "channelId":"<channelId>"}The quickest way to get most of the required values is to copy the link to the tab itself:

You’ll see a URL similar to:
https://teams.microsoft.com/l/entity/26bda823-6023-480c-a22b-6b6s6605ce8c/_djb2_msteams_prefix_3161176291?context=%7B%22subEntityId%22%3Anull%2C%22channelId%22%3A%2219%3Aa7d7f48c9854129040ac4057c5245727%40thread.skype%22%7D&groupId=372f916c-76da-427c-887c-b1cf48ee6d4a&tenantId=9b8fa496-cfa6-4554-87a0-b6ad369872a15The highlighted portion contains the URL‑encoded deep link. All that’s missing is the list item ID you want to link to. Replace the null with %22<ID>%22, where <ID> is the item’s ID.
Post the message to list conversations
We can display our Adaptive Card in the list item’s conversation thread by sending an HTTP request.
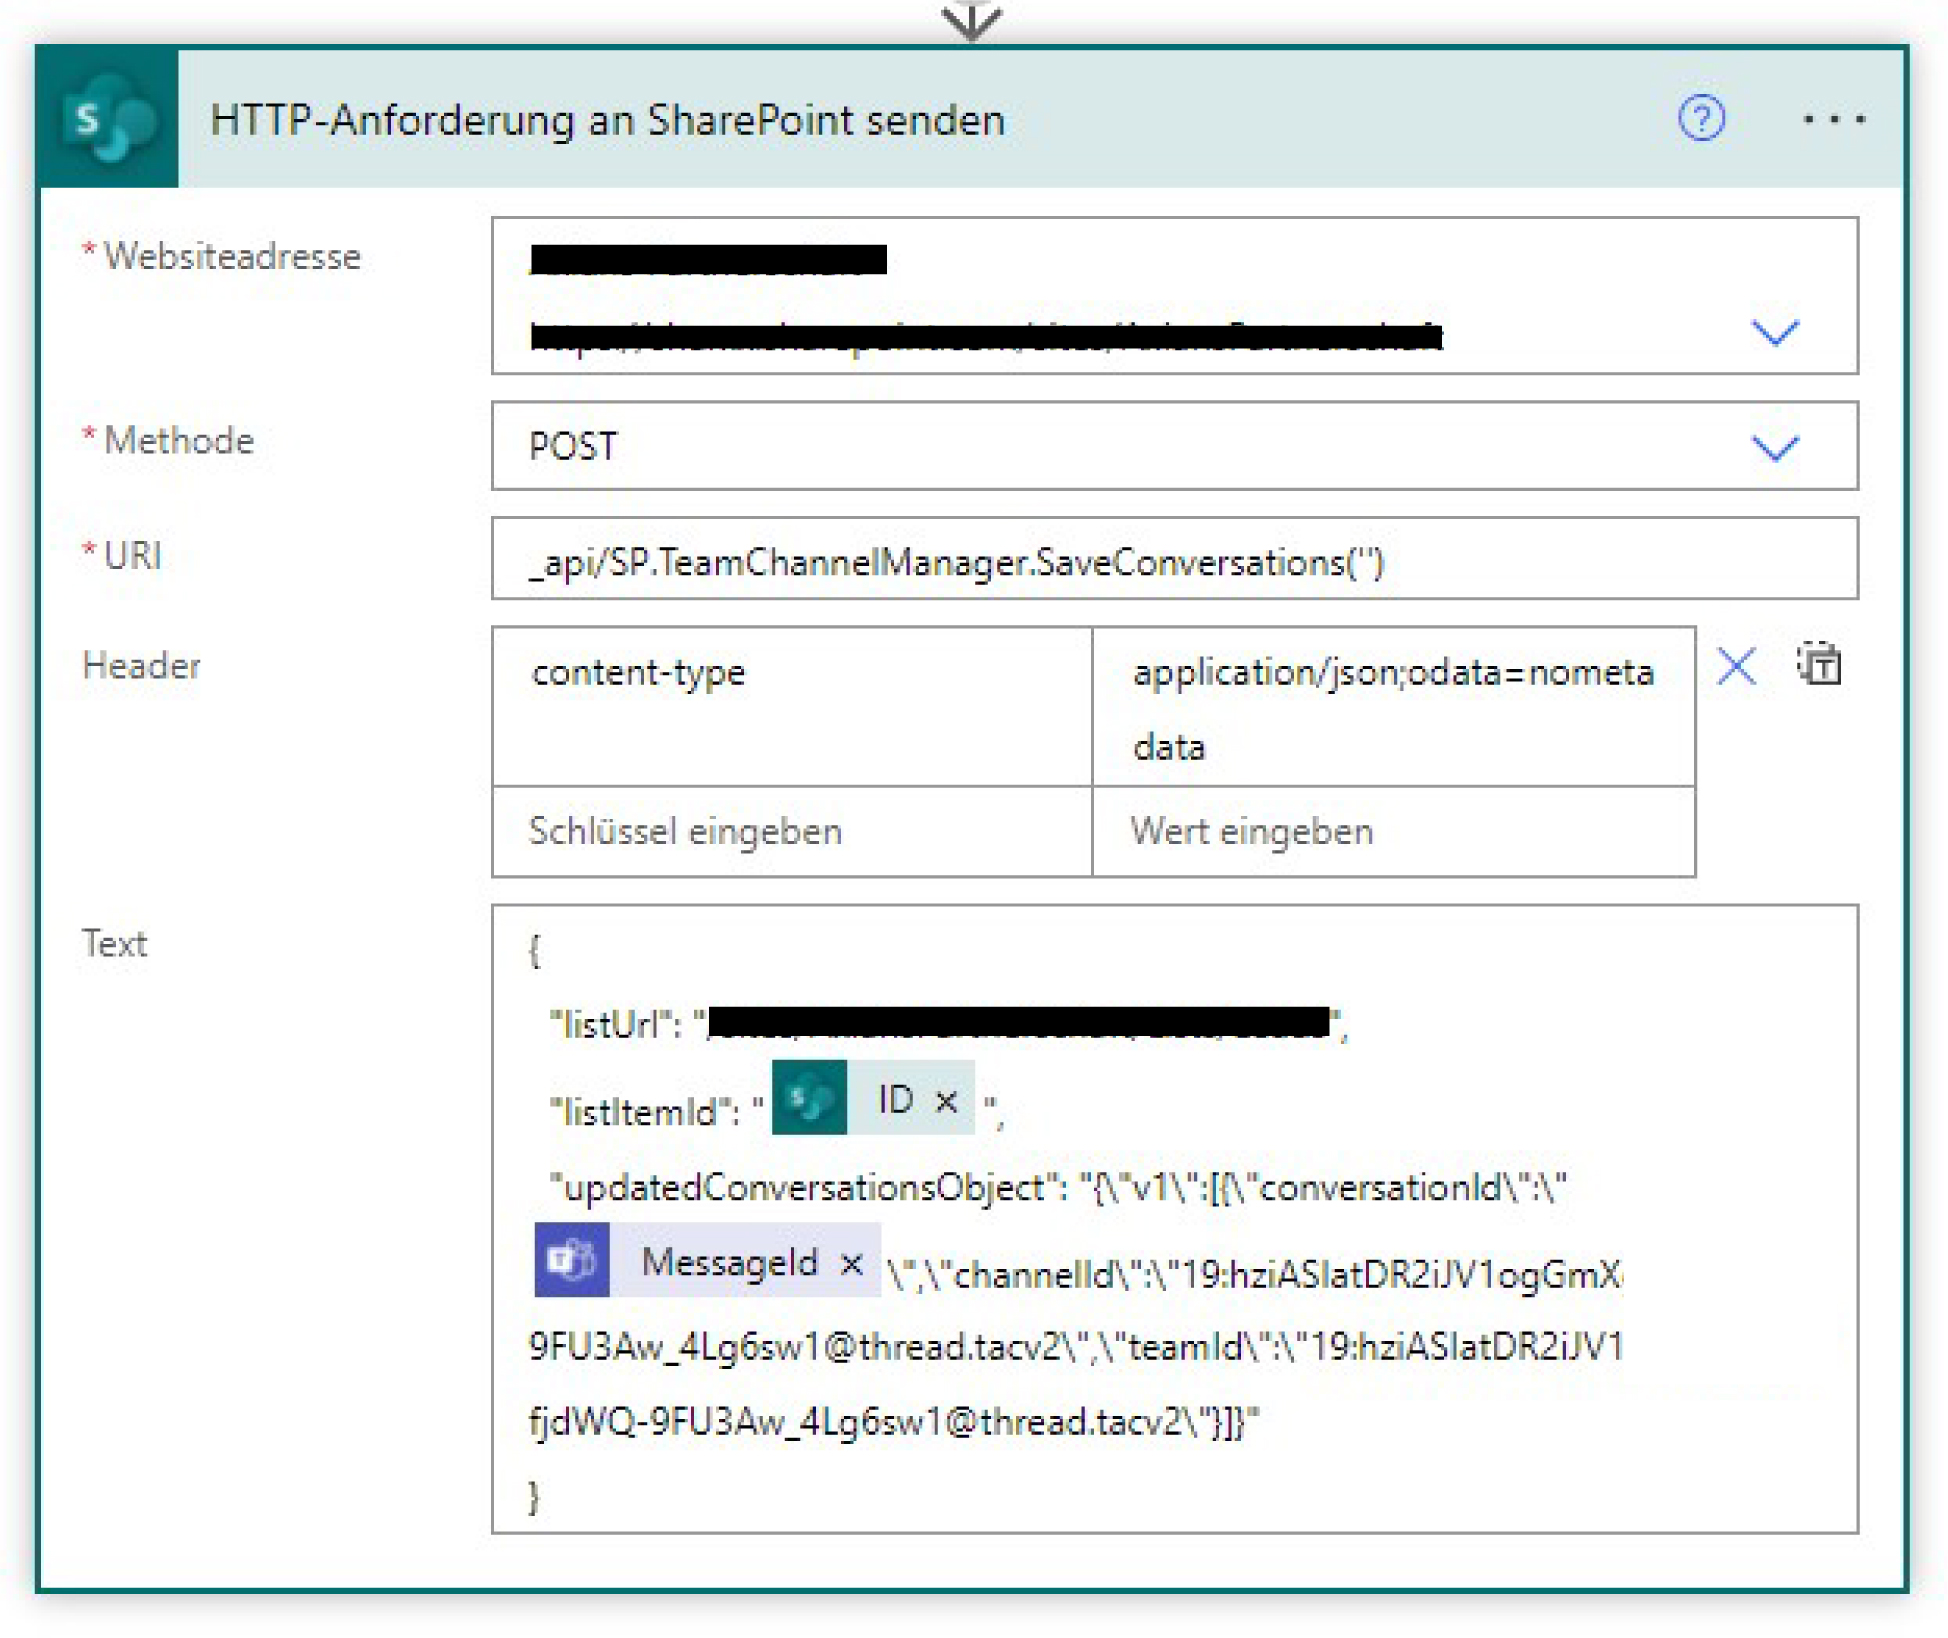
You’ll need:
- The list URL and the item ID
- The message ID of the Adaptive Card
- The channel ID and team ID
To get the channel ID, open the channel’s context menu (three dots) and select “Get link to channel.” You’ll get a URL like:
https://teams.microsoft.com/l/channel/19%3ab8ad7f48c4546fb90ac4057c524ab727%40thread.skype/<list>?groupId=<groupid>&tenantId=<tenantid>For the actual channel ID, replace %3a with : and %40 with @. In this example, the channel ID becomes 19:b8ad7f48c4546fb90ac4057c524ab727@thread.skype.
Do the same with the team link to extract the team ID. That’s it — your team gets notified as soon as a new lead is created in the list.